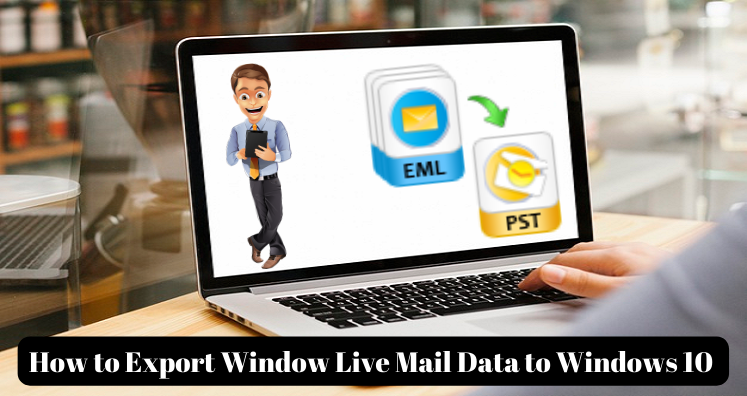
Windows Live Mail is a free mail app that comes with Windows OS. It is complementary with Windows 8 Mail, Windows 8.1 Mail and Windows 10 Mail. Earlier this application was present in older versions of Windows 7, XP, Vista. The name of this application was Windows Live Mail Desktop. Windows have launched this old mail application with numerous user-friendly features.
Windows comes with MS Suite called MS Office. The outlook is a mailing application and popularly used on Windows device. This mail application is part of MS Office Suite. Now, if you have been using Windows Live Mail and now shifted to MS Outlook application, and want to move your Windows Live Mail data to another platform, then this article is for you. In this article, we are going to help you with exporting Windows Live Mail data to Outlook without loss.
Now, this is basic but we would like to share that both Windows Live Mail and Outlook share a common platform, nevertheless, the file format of both applications is different. And, to access data of Windows Live Mail in Outlook, the user first has to convert Windows Live Mail file data, which is EML to PST.
One of the best ways to transfer email data is by using software that converts file format. The EML to PST converter tool is one of the best for this work. It is a performing software, and it converts entire data present in EML file to PST format. It does the conversion without loss and changes the core structure of EML file data.
Table of Contents
Top Reasons Why Users Switch From Windows Live Mail To Outlook
Before sharing knowledge on how to convert Windows Live Mail data to Outlook, let’s have a look at the reasons why people switch from one platform to another.
• Most Windows users use Outlook application for sending or receiving emails.
• MS Outlook has more advance features than Windows Live Mail. It allows users to save contacts, calendar, reminders, tasks, etc.
• It gives a large storage space to save data.
• It is a secured email application. It is more secure than many of its counterparts.
The Simple And Easy Way To Convert Windows Live Mail Data To PST Format
Before converting the Windows Live Mail EML file to PST format, your first step is to locate the windows mail folder that contains the EML file. Here is the step by step guide to locate Windows Mail Folder.
- Open the Windows Live Mail application, and from here select the option Tool.
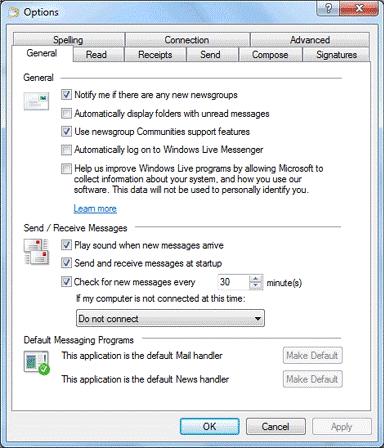
2. Select the option advance search at the top. And then click on the Maintenance button.
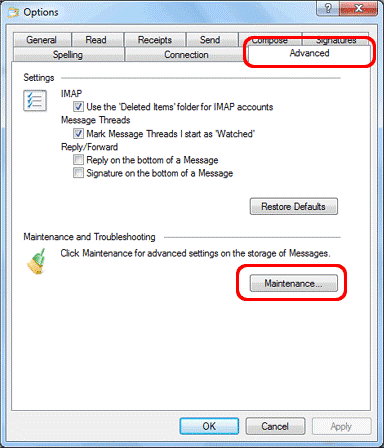
3. In the Maintenance Box window, you will get another option Store Folder. Click on the same.
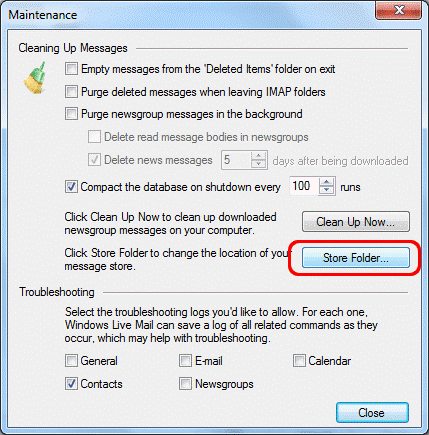
4. The option will display a new window showing Store Folder Location.
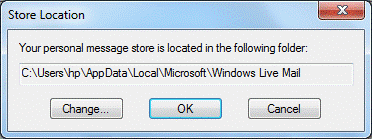
In this folder, Windows Live Mail is present. You can locate folders of all the users of Windows Live Mail. Each folder contains the EML files
Export Windows Live Mail Data To Outlook.
Now you have Windows Live Mail EML file with you. Learn the process to convert EML file to PST. Here is the step by step guide for the same.
- Open both Windows Mail and Outlook on your device.
- In the Windows Live Mail, click on the option File, after that click on option Export Email and then Email Messages.
- A window will open in front of users named Select Program. Here, click on the options Microsoft Exchange and then click the Next button. If you are prompted for confirmation, then click on the OK button for the same.
- If you are asked to select the desired profile, then choose Outlook, and then click on the OK button. Most of the time, users receive only one profile, i.e. Outlook.
- You will get the option to choose the folder you want to move to Outlook. Select the same and click the Ok button.
Let the conversion process complete. Click on the Finish button when the ‘Export Complete’ window opens.
Limitations Of Manual Process
The limitations of manual process are many, such as
- You won’t be able to move all the folders.
- The process involves multiple steps. Error in any step will fail the conversion process.
- The chances of error in this method are high.
Use Professional Method To Convert File Format
Directly Convert Windows 10 Emails
- From the Windows 10 system get Windows 10 Mail storage file

- If you are unable to Appdata folder, then change setting from view tab.
- In the mail folders, you will get all emails in trash, sent items, draft, Inbox.
- After having all emails, copy and paste them to a new folder at a location of your choice.
Method 2: Export Emails From Windows Live Mail
If you are unable to locate the Windows10 mail from your device, then follow this method.
- Launch Windows 10 emails application and open email messages that you want to move to Outlook.
- Right-click on the mail, and select the option ‘Save As’.
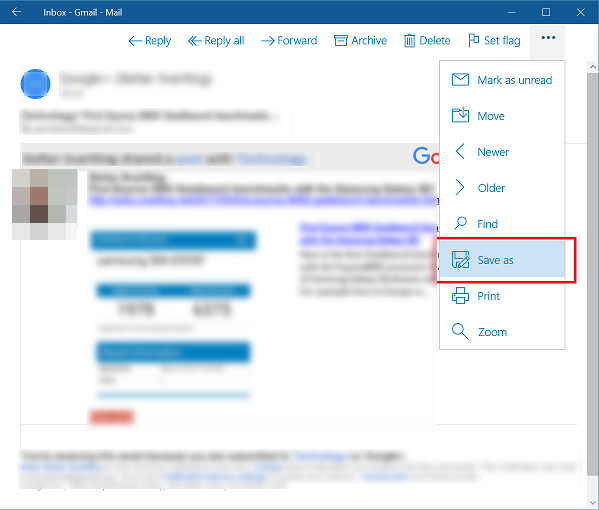
- Choose the option (.eml) and set the file location. Click on the Save button after that.
- Repeat the same process, to save all emails that you want to move to Outlook in EML format.
Outlook accepts EML files, you can drag and drop this file in Outlook to access it. You can also use the import method.
The Fastest And Easiest Method To Transfer File
The third method to transfer Windows Live Mail data is Outlook is taking the help of software. One of the best software to do this job is EML to PST converter. This wonderful wizard facilitates the transfer of the file from one format to another in the quickest possible time with no error. Here is the step by step guide to transfer Windows Live Mail email data to Outlook.
At first, locate the Windows Live Mail store folder location. Then, save the EML file at the desired location on your device. The steps for the same, we have explained above.
- Install the software on the device you are going to use for data conversion.
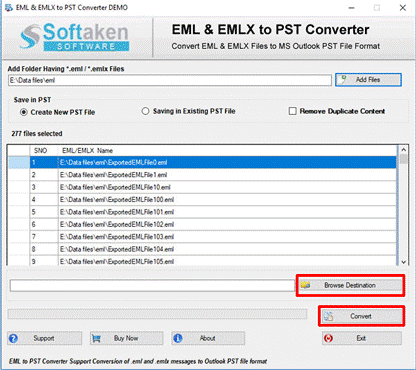
2. Browse the location of the EML file or folder in the device.
3. Apply filter options like ‘Remove duplicate emails’, Existing PST or create new.
4. Select the desired location where you want to save the PST file.
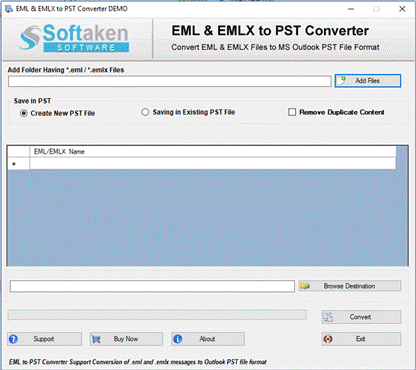
5. Click on the option ‘Start processing’ to execute the migration process.
After getting the PST file, use the Import/Export option of Outlook to transfer PST in Outlook.
The software method is one of the safest ways of transferring data. It will not lead to any loss of data, moreover, it maintains the data integrity during the transfer.
The software has a simple and user-friendly interface that let you transfer the entire data in a few clicks, and it has many features that let you do batch transfer or selective transfer of data.
Conclusion: In this article, we have shared how users of Windows Live Mail could transfer their email application data to Outlook. We have suggested three methods here. We recommend the software method as it is one of the safest ones.